This post will definitely help all those out there who have been looking for a good antivirus.....and that to full version,with no cracks,registry tweaks,etc.......original license way.......
Here I present ESET Nod32 plus its "key finder software"(MiNODLogin),so that you just get licenses at your screen without searching around the web.....
Why ESET Nod32 ??
Coz it's the best.Believe me I have tried all......
Norton....don't talk about it,it ruins the system,as if it were built to run only norton and nothing else.
Avast.......the most ugliest antivirus program,It is fast but don't know if it catches any viruses.
Kaspersky.....a bit faster than norton but slower than avast...also doesn't detect some of the viruses.
AVG........I don't like its interface and not easily available as full version.
ESET nod32 detects all viruses...the "new folder","autorun.inf",etc.
Its fast like avast and powerful like norton.Besides you don't need to worry about license.ESET Antivirus License Finder (MiNODLogin) finds the license keys for you to use ESET as full version.....
Also like Avast and AVG,ESET Nod32 can be updated in offline mode,i.e,you don't need to have internet connection to your system.To do so there is a software called "ESET Virtual Update Server (MiNODServer)".
1. Download and Install the setup --
You can download and then install the setup file from the official website of ESET.
Note: Don't go for ESET smart security....Go for ESET Antivirus.....
http://www.eset.com/download/free_trial_download_int.php
Here you can select the setup file that suits your systems configuration.These setup files are the most updated ones available throughout the web.
2. ESET MiNODlogin --
Here's the software download link
ESET Antivirus License Finder (MiNODLogin)
You need to install java in your system for this software to work.Here's the java link
JAVA Setup
After installing java and downloading Minodlogin just install the .exe file.You should then be able to run the software from shortcut on desktop.
The system must be connected to internet.Once you run the software,a window will appear where some sites will be enlisted.
Simply expand any one of the site (by clicking on the "+" sign before each of them).Now you will see the keys (User names and passwords).Copy and paste any key in ESET.
You are now a registered user and can "update" the virus database as well as "upgrade" to full version.
3. ESET MiNODserver --
Sorry folks,I tried n googled but this software is not available in english.It is in some european language,so until it is available in english,you need to have internet connection to be able to update ESET.....
Saturday, January 30, 2010


Sunday, October 25, 2009
DBAF Comic by Toyble
DBAF, where the "AF" stands for "After Future" or "Another Future", is the new Dragonball Series after the DBGT. It is not an official series of Dragonball,as admitted by Akira Toriyama, the creator of DB_Z_GT. But is a Fanfic Art, created by the fans of DB_Z_GT who were not willing to accept the end of Dragonball Series.
There are many versions of DBAF floating around the web, but one of the manga fan named TOYBLE has done a job that is truly appreciable. He publishes the Comic pages on his blog http://blog.livedoor.jp/toyble/ (Less frequently though). The characters drawn by him are just the same as found in DB_Z_GT. The comic is simply awesome.
Have a look. Vegeta at Super Saiyan level 4 being attacked by XICOR (a Super Saiyan 5).

I, being a "big" fan too, thereby post here the latest pages from the comic.
Download the zipped volumes from the links below :-
» Toyble_DBAF_Volume_01 (30.2 MB)
» Toyble_DBAF_Volume_02 (30.7 MB)
» Toyble_DBAF_Volume_03 (19.3 MB)
» Toyble_DBAF_Volume_04 (14.9 MB)
Some how, Toyble has not been able to continue the work and has paused publishing new images. The story is yet to end :( But for the time being, to have an ending to the story in some sense, he has released an extra volume.
» Toyble_DBAF_Volume_04_Extra (5.68 MB)
Here are some extra pix, to be added later on. The story would finally converge to the point where all the saiyans alive, including Broli !!, don't stand a chance and GOKU finally reveals his next level, HALF SAIYAN HALF GOD !!!


There are many versions of DBAF floating around the web, but one of the manga fan named TOYBLE has done a job that is truly appreciable. He publishes the Comic pages on his blog http://blog.livedoor.jp/toyble/ (Less frequently though). The characters drawn by him are just the same as found in DB_Z_GT. The comic is simply awesome.
Have a look. Vegeta at Super Saiyan level 4 being attacked by XICOR (a Super Saiyan 5).

I, being a "big" fan too, thereby post here the latest pages from the comic.
Download the zipped volumes from the links below :-
» Toyble_DBAF_Volume_01 (30.2 MB)
» Toyble_DBAF_Volume_02 (30.7 MB)
» Toyble_DBAF_Volume_03 (19.3 MB)
» Toyble_DBAF_Volume_04 (14.9 MB)
Some how, Toyble has not been able to continue the work and has paused publishing new images. The story is yet to end :( But for the time being, to have an ending to the story in some sense, he has released an extra volume.
» Toyble_DBAF_Volume_04_Extra (5.68 MB)
Here are some extra pix, to be added later on. The story would finally converge to the point where all the saiyans alive, including Broli !!, don't stand a chance and GOKU finally reveals his next level, HALF SAIYAN HALF GOD !!!


LEVEL 5!!!!
Friday, October 16, 2009
HOW TO INSTALL WINDOWS VISTA/7 USING PEN DRIVE
I had earlier posted on how to Install Windows XP using a Pen Drive.
This post would help you Installing Windows Vista/7 using Pen Drive.
The need is same as earlier. A crashed system requires fresh windows installation and unfortunately CD-DVD Drive is also sailing in the same boat, thus use a Pen Drive.
Although XP installation takes longer time than CD/DVD,Windows Vista/7 installaion on the other hand is faster than DVD disc.This is because XP installtion environment does not have latest USB 2.0 drivers, but Vista/7 does.
REQUIREMENTS :
1) SETTING UP BIOS
Before anything is done,check if your BIOS allows USB-BOOTING.
Refer to my post "Setting Up BIOS for Booting from Pen Drive or External HDD" to enable booting from Pen Drive.
2) FORMATTING PEN DRIVE
The Pen Drive should be formatted in NTFS to install Windows Vista/7.
If you are working on Vista/7 then simply format the Pen Drive in NTFS file system.
But if you are working on XP then you don't find the NTFS option while formatting a Pen Drive.
Follow these steps :


Now if you go for formatting the Pen Drive then NTFS option will be present.
3)) PREPARING BOOTABLE PEN DRIVE
The whole thing is just making Pen Drive bootable.Rest all installation is exactly same as with DVD disc.
Before making Pen Drive Bootable,it must be made an Active Partition.After that it can be made bootable.
# SETTING PEN DRIVE AS ACTIVE PARTITION
If You Are Working On XP
Download the file MBRwiz2.0 and extract to a folder (i extract to the directory d:/temp).
1. Open command prompt(cmd).
2. Use command 'cd' to go to the directory where you extracted MBRwiz2.0 (as shown below,Click the image for zoomed view).Then type the following command "mbrwiz /list" (all commands must be typed without the quotes) as shown in red box and press ENTER.

3. Once you do so,it will dislpay all the storage devices connected to the system and their respective partitions,here "disk 1" is the Pen Drive (if no other pen drive/usb Hdds are connected).By default the active parameter is set to "no" for Disk 1(shown in red box below).Now type the command "mbrwiz /disk=1 /active=1" and press ENTER.
Note : the command should be typed as it is,be careful with spaces too.

4. Now it will ask for confirmation.Type 'y'.Then the screen should look as below

5. Now the Pen Drive is an active partition and can be made bootable.
Also in step 3 if you type command "mbrwiz /disk=1 /active=0" then the pen drive will become inactive partition as it was earlier.
If You Are Working On Vista/7


Now simply extract the Windows Vista/7 installation files to a folder named "win" on desktop if you have the rar/zip file of Windows Vista/7 DVD.
But if you have a DVD Image file of the Windows Vista/7 DVD,then you need a Virtual CD-DVD drive Emulator.Download and Install UltraISO and mount the image file on virtual drive and then copy the files to folder "win" on desktop.
A small tutorial to work with UltraISO :
# MAKING PEN DRIVE BOOTABLE
FOR VISTA/7 -

NOW JUST COPY ALL THE CONTENTS OF "WIN" FOLDER TO YOUR PEN DRIVE.
IT IS FINALLY READY TO INSTALL WINDOWS VISTA OR WINDOWS 7.
JUST RESTART SYSTEM WITH PEN DRIVE PLUGGED IN AND INSTALL WINDOWS AS YOU WOULD DO USING A DVD.
CHECK OUT THE SPEED!!!!
This post would help you Installing Windows Vista/7 using Pen Drive.
The need is same as earlier. A crashed system requires fresh windows installation and unfortunately CD-DVD Drive is also sailing in the same boat, thus use a Pen Drive.
Although XP installation takes longer time than CD/DVD,Windows Vista/7 installaion on the other hand is faster than DVD disc.This is because XP installtion environment does not have latest USB 2.0 drivers, but Vista/7 does.
REQUIREMENTS :
- USB-Boot enabled BIOS.
- A Pen Drive (Atleast 4GB).
- Windows Vista/7 Installation Files (As DVD Image File or RAR/ZIP Compressed File)
- MBRwiz2.0 (Download).
- UltraISO,a CD-ROM drive emulator (Download).
1) SETTING UP BIOS
Before anything is done,check if your BIOS allows USB-BOOTING.
Refer to my post "Setting Up BIOS for Booting from Pen Drive or External HDD" to enable booting from Pen Drive.
2) FORMATTING PEN DRIVE
The Pen Drive should be formatted in NTFS to install Windows Vista/7.
If you are working on Vista/7 then simply format the Pen Drive in NTFS file system.
But if you are working on XP then you don't find the NTFS option while formatting a Pen Drive.
Follow these steps :
- Right click My Computer icon on desktop (it is also found in start menu).
- In the Tools tab,click Device Manager.
- A number of system components are listed here.Click on Disk Drives.
- Right click your Pen Drive in the Sub Menu of Disk Drives and choose properties.

- In the window that pops up,go to the Policies Tab.
- Under this check the option "Optimize for performance".

Now if you go for formatting the Pen Drive then NTFS option will be present.
3)) PREPARING BOOTABLE PEN DRIVE
The whole thing is just making Pen Drive bootable.Rest all installation is exactly same as with DVD disc.
Before making Pen Drive Bootable,it must be made an Active Partition.After that it can be made bootable.
# SETTING PEN DRIVE AS ACTIVE PARTITION
If You Are Working On XP
Download the file MBRwiz2.0 and extract to a folder (i extract to the directory d:/temp).
1. Open command prompt(cmd).
2. Use command 'cd' to go to the directory where you extracted MBRwiz2.0 (as shown below,Click the image for zoomed view).Then type the following command "mbrwiz /list" (all commands must be typed without the quotes) as shown in red box and press ENTER.

3. Once you do so,it will dislpay all the storage devices connected to the system and their respective partitions,here "disk 1" is the Pen Drive (if no other pen drive/usb Hdds are connected).By default the active parameter is set to "no" for Disk 1(shown in red box below).Now type the command "mbrwiz /disk=1 /active=1" and press ENTER.
Note : the command should be typed as it is,be careful with spaces too.

4. Now it will ask for confirmation.Type 'y'.Then the screen should look as below

5. Now the Pen Drive is an active partition and can be made bootable.
Also in step 3 if you type command "mbrwiz /disk=1 /active=0" then the pen drive will become inactive partition as it was earlier.
If You Are Working On Vista/7
- Plug in the Pen Drive.
- Go to Start Menu and type "cmd".The cmd icon appears in list.
- Right Click the cmd icon and choose "Run as administrator",click "yes" on the next UAC window (User Account Control).
- Type "diskpart" and press ENTER.
- Type "list disk" and press ENTER.This will list down all storage disks connected to the system,even your HDD.Note the Disk No. for your Pen Drive (usually it is Disk 1 if no other pen drives and external hdd's are connected).
- Type "select disk x" and press ENTER,where "x" is your disk no. of your pen drive.This will select your Pen Drive.The screen should look as below till this step.

- Type "list partition" and press ENTER.This will list down the partitions on your pen drive (usually there is only one partition with no. "1").
- Type "select partition 1" and press ENTER.This will select the only partition on your Pen Drive.
- Now type "active" and press ENTER.This makes the pen drive active partition.To make it inactive simply type "inactive" instead of "active".The screen now should be as below.

- Exit cmd
Note : The Pen Drive is not bootable now,it is an Active Partition.Only an Active Partition can be made bootable.
Now simply extract the Windows Vista/7 installation files to a folder named "win" on desktop if you have the rar/zip file of Windows Vista/7 DVD.
But if you have a DVD Image file of the Windows Vista/7 DVD,then you need a Virtual CD-DVD drive Emulator.Download and Install UltraISO and mount the image file on virtual drive and then copy the files to folder "win" on desktop.
A small tutorial to work with UltraISO :
- After installing,go to My Computer.
- There you will find an extra virtual CD-ROM drive.Right click this drive.
- In the subsequent selection menu there will be an option "UltraISO".Choose it.
- Another sub menu will pop out.Choose the option "Mount" here.
- A window will appear where you can browse your cd-image file.
- Browse it and click OK.Your CD-IMAGE FILE is now mounted on to the drive.
- Open the drive and copy all files to "win" folder on desktop.
# MAKING PEN DRIVE BOOTABLE
FOR VISTA/7 -
- Open cmd by "run as administrator" option.By default the current directory is "c:/windows/system32".We have to change this directory to desktop.
- First type "cd\" and press ENTER.This will take you to root directory,i.e,C:
- Now type "cd users/xxxx/desktop" and press ENTER.Here "xxxx" is your User Name with which you logged into Windows.
- Type "cd win/boot" and press ENTER.
- Then type "bootsect /nt60 x:" and press ENTER.Here "x" is the drive letter for your Pen Drive.Once you hit ENTER the screen should look as below

- Exit cmd.
- Open cmd.
- Type "cd desktop/win/boot" and press ENTER.
- Then type "bootsect /nt60 x:" and press ENTER.Here "x" is the drive letter for your Pen Drive.The results should be same as above.
- Exit cmd.
NOW JUST COPY ALL THE CONTENTS OF "WIN" FOLDER TO YOUR PEN DRIVE.
IT IS FINALLY READY TO INSTALL WINDOWS VISTA OR WINDOWS 7.
JUST RESTART SYSTEM WITH PEN DRIVE PLUGGED IN AND INSTALL WINDOWS AS YOU WOULD DO USING A DVD.
CHECK OUT THE SPEED!!!!
Tuesday, October 13, 2009
SETTING UP BIOS FOR BOOTING FROM PEN DRIVE OR EXTERNAL HDD
What we have to do here is to enable our system to boot from USB Pen Drive.
Before going to details you must check if you really need to change settings in BIOS.
Just press the key (when you start the system with Pen Drive inserted) that opens the boot sequence.This key is generally F10,F12,ESC,etc.

Here if your Pen Drive is listed in the sequence then simply select it to boot.
But if not then read on....
Note : The BIOS(Basic Input Output Setup) varies from PC to PC.Yours may be different (still you could get some "how about" of setting up BIOS from this post).Also some BIOS do not support USB booting (then this tutorial will not help you).
Note of Caution : First read the full post and then try.
The steps are :
1. Power on your PC and press the key required to enter BIOS setup.This Key is usually F2,DEL or F11 on different systems and is displayed at the first screen when system starts.
At first the screen should look as below
![]()
2. Go to the BOOT option using the right-left arrow keys shown in green box below.
Note: Some system's BIOS do not show the BOOT option.In that case you will find the BOOT ORDER (what we are actually looking for) in some other option.
![]()
Once you have found the Boot Order,then it might be that your USB Pen Drive/HDD is disabled from boot order as shown in yellow box.
Using the options shown on the right pane of the screen (in red boxes) you can enable the device (here 'x' is used to enable/disable the device from boot order).
Note : Every system on startup scans for booting devices according to the boot order setup in BIOS.Your system's hard disk is also one of them (usually starting with IDE HDD.....).
Here just make sure that your pen drive is above your system's hdd in boot priority order.This can be done again by using options in the right pane (here F5 and F6 are used to decrease and increase the priority respectively).
If everything has been done right then screen should look as below,with USB device at the top (in red box).
![]()
Note : On some BIOS the procedure to change boot priority and enable/disable is not as simple as here.Those who are new to this must not try this as it may damage your system.
3. After doing so go to the Exit option and exit saving the changes.
![]()
Now your system is ready to boot from Pen Drive.
Before going to details you must check if you really need to change settings in BIOS.
Just press the key (when you start the system with Pen Drive inserted) that opens the boot sequence.This key is generally F10,F12,ESC,etc.

Here if your Pen Drive is listed in the sequence then simply select it to boot.
But if not then read on....
Note : The BIOS(Basic Input Output Setup) varies from PC to PC.Yours may be different (still you could get some "how about" of setting up BIOS from this post).Also some BIOS do not support USB booting (then this tutorial will not help you).
Note of Caution : First read the full post and then try.
The steps are :
1. Power on your PC and press the key required to enter BIOS setup.This Key is usually F2,DEL or F11 on different systems and is displayed at the first screen when system starts.
At first the screen should look as below

2. Go to the BOOT option using the right-left arrow keys shown in green box below.
Note: Some system's BIOS do not show the BOOT option.In that case you will find the BOOT ORDER (what we are actually looking for) in some other option.

Using the options shown on the right pane of the screen (in red boxes) you can enable the device (here 'x' is used to enable/disable the device from boot order).
Note : Every system on startup scans for booting devices according to the boot order setup in BIOS.Your system's hard disk is also one of them (usually starting with IDE HDD.....).
Here just make sure that your pen drive is above your system's hdd in boot priority order.This can be done again by using options in the right pane (here F5 and F6 are used to decrease and increase the priority respectively).
If everything has been done right then screen should look as below,with USB device at the top (in red box).

Note : On some BIOS the procedure to change boot priority and enable/disable is not as simple as here.Those who are new to this must not try this as it may damage your system.
3. After doing so go to the Exit option and exit saving the changes.

FORGOT LOGIN PASSWORD!!!
If you've forgotten login password to your system and are unable to login then you are at right place.....read on....
Windows provides a login facility to user accounts on a system.A user who has an account on the system can authenticate himself by a Username and Password.
There is a solution in Windows XP,we can boot into Safe Mode and simply login using an Administrator account (which is not visible in the normal startup of the system) and change password of any user on that system.
The solution wouldn't work if one has password protected that administrator account and has forgotten its password also.
This Safe Mode method doesn't work in Vista or 7.
The Hard Way is to format your system,which may result in loss of important data.
There are softwares on internet like the Ophcrack which can recover the lost password.But the problem is that it is quite bulky in size (500MB).So why not remove the password instead using a method involving approx 3MB download only.
This method could be used from a Bootable CD or a Pen Drive too.
Note : The system must support USB booting for this method to work from a Pen Drive.
REQUIREMENTS
# If you are using Pen Drive then :

# If you are using CD then:
Download the Image File from above and simply burn/write it to a blank CD-ROM.Your Bootable CD is ready.
2)) WORKING WITH BOOTABLE DEVICE
1. Insert the Bootable CD/Pen Drive and restart your system.The system will automatically boot from your bootable and follwing screen will appear.Just press ENTER here and wait for some time until the screen freezes completely(you need to be patient here).
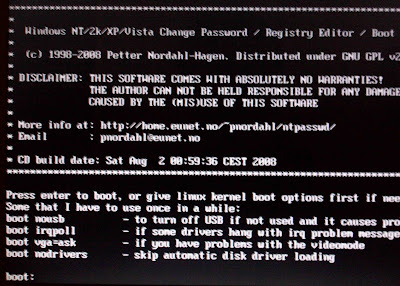
2. After a while the screen looks like below.In the red box are the partitions of your hard disk.It has automatically selected the system partition in which windows is installed.Now press ENTER.

3. NOW,
# If the computer was shut down properly,then it's fine and the screen looks as below,asking you the Path and Registry Files,just press ENTER here (to choose the default Path) and proceed to next step.


4. It will show various options as below
 The option "1" for password reset is by default selected and just press ENTER.
5. Upon doing so the system will show further options as below


Here the option "1" for clearing the password is not selected by default,so type "1"(without quotes,of course) and press ENTER.
8. The Password has been cleared now (1st red box).
Enter "!" and press ENTER (2nd red box).
The system will now give you back the same options as in Step 6 (where 1 was by default selected and you pressed ENTER).Now enter the option "q" (to quit) and press ENTER (3rd and 4th boxes).
Now you will be prompted to write back the changes made till now (5th and 6th boxes).Type "y" and press ENTER.
The EDIT is now complete.Type "n" and press ENTER to reject the next prompt (for NEW RUN).
The screen for above should look as below

9. Now the final screen should look as below,with a "#" at the bottom of the screen.
 Now Restart the system and remove the CD/Pen Drive.
THE LOGIN PASSWORD's RESET........
NOTE:
1. This method will remove your password not recover.
2. The method works successfully for windows XP,Vista and Windows 7
3. This is for information purposes only.I am not responsible for any damages or illegal acts resulting from this information.
4. The information provided here should be used for legal purposes only.
5. USB Disk method will not work if your motherboard or BIOS does not suport USB booting.
Windows provides a login facility to user accounts on a system.A user who has an account on the system can authenticate himself by a Username and Password.
There is a solution in Windows XP,we can boot into Safe Mode and simply login using an Administrator account (which is not visible in the normal startup of the system) and change password of any user on that system.
The solution wouldn't work if one has password protected that administrator account and has forgotten its password also.
This Safe Mode method doesn't work in Vista or 7.
The Hard Way is to format your system,which may result in loss of important data.
There are softwares on internet like the Ophcrack which can recover the lost password.But the problem is that it is quite bulky in size (500MB).So why not remove the password instead using a method involving approx 3MB download only.
This method could be used from a Bootable CD or a Pen Drive too.
Note : The system must support USB booting for this method to work from a Pen Drive.
REQUIREMENTS
- A blank CD-ROM or Pen Drive.
- UltraISO,a CD/DVD Drive Emulator (Download).
- Offline NT Password and Registry Editor program ISO Image File (Download).
# If you are using Pen Drive then :
- Firstly refer to my post "Setting Up BIOS for Booting from Pen Drive" to enable booting from pen Drive.
- After that Download and Install UltraISO.Then Mount the NT passwd and Registry Editor Image File to the Virtual Drive.A small tutorial to work with UltraISO :
- After installing,go to My Computer.
- There you will find an extra virtual CD-ROM drive.Right click this drive.
- In the subsequent selection menu there will be an option "UltraISO".Choose it.
- Another sub menu will pop out.Choose the option "Mount" here.
- A window will appear where you can browse your cd-image file.
- Browse it and click OK.Your CD-IMAGE FILE is now mounted on to the drive.
- Now copy all the contents of the Image File to the Pen Drive.
- If you are working on Vista or Windows 7 then you will have to skip a file from being copied.
- In XP don't select the first file (probably it has no name) while copying the contents of the Image File.It should then work.
- Run CMD (In Vista/7 "run as administrator").
- Type the Drive Letter of your Pen Drive,say "x:" (excluding quotes) and press ENTER.
- Now type the command "syslinux -ma x:" (excluding quotes) and press ENTER.
- Exit CMD.

Download the Image File from above and simply burn/write it to a blank CD-ROM.Your Bootable CD is ready.
2)) WORKING WITH BOOTABLE DEVICE
1. Insert the Bootable CD/Pen Drive and restart your system.The system will automatically boot from your bootable and follwing screen will appear.Just press ENTER here and wait for some time until the screen freezes completely(you need to be patient here).

2. After a while the screen looks like below.In the red box are the partitions of your hard disk.It has automatically selected the system partition in which windows is installed.Now press ENTER.

3. NOW,
# If the computer was shut down properly,then it's fine and the screen looks as below,asking you the Path and Registry Files,just press ENTER here (to choose the default Path) and proceed to next step.

# But if the computer was not shut down properly then the it will show a warning as below

Here just type in "y" and press ENTER.Now the system must ask you the PATH and Registry Files same way as in first case.Now you can press ENTER and goto next step.
4. It will show various options as below

5. Upon doing so the system will show further options as below

Again the option "1" for Editing User Data and Password is selected by default,just press ENTER.
6. All the user accounts on system with their usernames will be displayed as below

Now Enter the UserName of the account whose password is to be removed (Careful,as it is case sensitive) and press ENTER.
7. It will then show you some options as below

Here the option "1" for clearing the password is not selected by default,so type "1"(without quotes,of course) and press ENTER.
8. The Password has been cleared now (1st red box).
Enter "!" and press ENTER (2nd red box).
The system will now give you back the same options as in Step 6 (where 1 was by default selected and you pressed ENTER).Now enter the option "q" (to quit) and press ENTER (3rd and 4th boxes).
Now you will be prompted to write back the changes made till now (5th and 6th boxes).Type "y" and press ENTER.
The EDIT is now complete.Type "n" and press ENTER to reject the next prompt (for NEW RUN).
The screen for above should look as below

9. Now the final screen should look as below,with a "#" at the bottom of the screen.

THE LOGIN PASSWORD's RESET........
NOTE:
1. This method will remove your password not recover.
2. The method works successfully for windows XP,Vista and Windows 7
3. This is for information purposes only.I am not responsible for any damages or illegal acts resulting from this information.
4. The information provided here should be used for legal purposes only.
5. USB Disk method will not work if your motherboard or BIOS does not suport USB booting.
Sunday, October 11, 2009
WEB DOWNLOADERS
HERE ARE THE SILVER BULLETS....
These are no Rapidhare crack or any,so called,Rapidshare hacks.They simplify downloading files from One-Click-File Hosters like Rapidshare,Megaupload,etc.They can be used by anyone(both premium and non-premium users).Just copy the links and sit back to watch your download complete.
You can also download full movies from rapidshare,storage.to,etc sites.
1)) Jdownloader
JDownloader is open source, platform independent and written completely in Java.Download and Extract the file.Run the program inside the extracted folder.After installation you are now ready to rock n download.
Whenever you copy any download link while browsing internet,Jdownloader automatically grabs the link.
Once the links are grabbed you can add them to download.It recognises several file sharing sites.Before starting download it will prompt you to accept the TOS (Terms Of Service) of all the different kinds of links,i.e.,If you have added 4 links of rapidshare and 3 links of Mediafire.com then it will prompt you twice,once for rapidshare and once for mediafire.
Jdownloader requires the system to have JAVA runtime enviornment installed.You can download JAVA here,
JAVA Setup
![]()
2)) E-Corp Elephant Downloader
It is another such application with integrated Web Browser.It does not require JAVA enviornment.It also does not require installation,simply Download and Extract and Run the program (named (E)lephant).It is available in Portable version.But still Jdownloader is more Stable and recommendable.
It works in the same manner as jdownloader by grabbing links copied by you while surfing the net.
Although it does not prompts you to accept any TOS.
![]()
These are no Rapidhare crack or any,so called,Rapidshare hacks.They simplify downloading files from One-Click-File Hosters like Rapidshare,Megaupload,etc.They can be used by anyone(both premium and non-premium users).Just copy the links and sit back to watch your download complete.
You can also download full movies from rapidshare,storage.to,etc sites.
1)) Jdownloader
JDownloader is open source, platform independent and written completely in Java.Download and Extract the file.Run the program inside the extracted folder.After installation you are now ready to rock n download.
Whenever you copy any download link while browsing internet,Jdownloader automatically grabs the link.
Once the links are grabbed you can add them to download.It recognises several file sharing sites.Before starting download it will prompt you to accept the TOS (Terms Of Service) of all the different kinds of links,i.e.,If you have added 4 links of rapidshare and 3 links of Mediafire.com then it will prompt you twice,once for rapidshare and once for mediafire.
Jdownloader requires the system to have JAVA runtime enviornment installed.You can download JAVA here,
JAVA Setup

The official website for Jdownloader is http://jdownloader.org/.
2)) E-Corp Elephant Downloader
It is another such application with integrated Web Browser.It does not require JAVA enviornment.It also does not require installation,simply Download and Extract and Run the program (named (E)lephant).It is available in Portable version.But still Jdownloader is more Stable and recommendable.
It works in the same manner as jdownloader by grabbing links copied by you while surfing the net.
Although it does not prompts you to accept any TOS.

The Official website for Elephant downloader is http://www.e-ddl.com/E-Download.php.
Saturday, October 10, 2009
USING GHOST BACKUP/RECOVERY FROM PEN DRIVE
GHOST is a software that can be used to backup or recover any partition on a storage disk connected to your system.
It is much easier to recover system using ghost (if it has been backed up using ghost earlier) than to make fresh installations everytime the system crashes.
Ghost can also be used from a Pen Drive.This is quite handy and helpful if in case CD-DVD ROM is not functioning.
REQUIREMENTS
Before anything is done,check if your BIOS allows USB-BOOTING.
Refer to my post "Setting Up BIOS for Booting from Pen Drive or External HDD" to enable booting from Pen Drive.
2)) PREPARING GHOST BOOTABLE PEN DRIVE
Download and extract the ghost files to any directory of your choice.The file ghost.exe (2.2 MB) is of concern,others are not required.
Download and extract the "Windows 98 Boot Files" to any directory of your choice.
Download and install the HP USB Storage Format Tool.
1. Run HP Format Tool.
3. File system should be "FAT32" (box 1).
4. Check the option "quick format" (box 2).
5. Check the option "create a DOS startup disk" (box 3).
6. Now browse for "DOS system files" (box 4).
 7. After browsing the folder containing DOS system files Click "Start".
8. It will show a warning message.Choose "Yes".
9. Choose "OK" in the subsequent summary window.
10. Now simply copy the Ghost.exe (2.2 MB) file to the Pen Drive.
3)) BACKING UP
1. Restart your system with Pen Drive plugged in.The computer should boot through it and following screen should appear as below
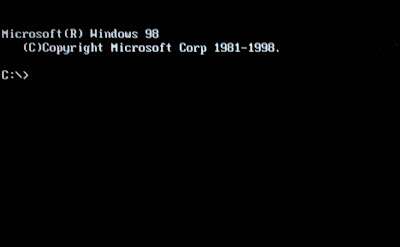

5. Now you will be prompted to select the "source disk" (which has the partition to be backed up,one of these will be your pen drive,usually the first one).Use up-down keys to select the source disk.Use "TAB" key to toggle to "OK" or "CANCEL" options.Once "OK" button is selected,press ENTER.
6. Now all the partitions of the selected disk will be listed.Select the partition to be backed up (usually first partition is the System Partition) and press ENTER.
7. Now the screen will appear as below


It is much easier to recover system using ghost (if it has been backed up using ghost earlier) than to make fresh installations everytime the system crashes.
Ghost can also be used from a Pen Drive.This is quite handy and helpful if in case CD-DVD ROM is not functioning.
REQUIREMENTS
- USB-BOOT enabled BIOS.
- A Pen Drive (any size will work).
- HP USB Storage Format Tool (Download).
- Ghost ".exe" file (Download).
- Windows 98 Boot Files (Download).
Before anything is done,check if your BIOS allows USB-BOOTING.
Refer to my post "Setting Up BIOS for Booting from Pen Drive or External HDD" to enable booting from Pen Drive.
2)) PREPARING GHOST BOOTABLE PEN DRIVE
Download and extract the ghost files to any directory of your choice.The file ghost.exe (2.2 MB) is of concern,others are not required.
Download and extract the "Windows 98 Boot Files" to any directory of your choice.
Download and install the HP USB Storage Format Tool.
1. Run HP Format Tool.
- In XP simply run the program
- In Vista/Windows 7 right click the program and choose "run as administrator".
3. File system should be "FAT32" (box 1).
4. Check the option "quick format" (box 2).
5. Check the option "create a DOS startup disk" (box 3).
6. Now browse for "DOS system files" (box 4).

8. It will show a warning message.Choose "Yes".
9. Choose "OK" in the subsequent summary window.
10. Now simply copy the Ghost.exe (2.2 MB) file to the Pen Drive.
3)) BACKING UP
1. Restart your system with Pen Drive plugged in.The computer should boot through it and following screen should appear as below

2. Type "ghost" and press ENTER.
3. Press ENTER on the "OK" button on the subsequent screen (showing "About Symantec Ghost").
NOTE : use the up-down-right-left arrow keys to select options
4. Now go to "Local" option.In the Sub Menu go to "Partition" and under its sub menu choose "To Image" as below

5. Now you will be prompted to select the "source disk" (which has the partition to be backed up,one of these will be your pen drive,usually the first one).Use up-down keys to select the source disk.Use "TAB" key to toggle to "OK" or "CANCEL" options.Once "OK" button is selected,press ENTER.
6. Now all the partitions of the selected disk will be listed.Select the partition to be backed up (usually first partition is the System Partition) and press ENTER.
7. Now the screen will appear as below

A. Press "Shift+TAB",this will select the "Look in" box (red box above).Now use up-down arrow keys to select among other partitions to save the backup file.After selecting the desired partition press ENTER to choose it.This will show the contents of the partition.Go to the folder where backup file is to be saved.
B. Now use "TAB" key one or more times to come to the "File name" box.Type in the name of the backup file.
C. Again use "TAB" key one or more times to come to "Save" button and press ENTER.
8. Once you press ENTER in STEP 7(C) the screen should look as below asking you the level of compression.Choose "High".

9. It will then ask whether to "Proceed with partition image creation",choose yes and sit back.
10. After image creation is complete press "Continue" and then choose "Quit".Now remove pen drive and restart the computer.Your system has been backed up.
NOTE : An image file may contain more than one partitions if the same file name is used again to backup another partition.
4)) RECOVERING
Everything proceeds same as till STEP 4 of BACKING UP.
In STEP 4 instead of choosing "To Partition" go for "From Partition".
1. On doing so the screen will appear as in STEP 7 of BACKING UP (here you have to browse the backup file from which recovery is to be made).Press "Shift+TAB",this will select the "Look in" box.Now use up-down arrow keys to select the partition in which the backup file is present.Go to the folder containing backup file as shown below

Press "TAB" key one or more times to come to "Open" button and press ENTER.
2. Now select the source partition in the backup file to be restored

3. Now select the Destination Disk (which contains the destination partition to be recovered),using up-down arrow keys and then pressing ENTER.

4. Now select the Destination Partition to be recovered,using up-down arrow keys and pressing enter.

5. Now it will ask you "Proceed with partition restore",Choose "Yes".
6. After Restore Completion,Choose "Reset Computer".Remove Pen Drive and let the System start.Your System is now Recovered.
Subscribe to:
Posts (Atom)